Pages

3/08/2015

Warre Bee Hive

This is a vertical top bar bee hive also known as the Peoples Bee Hive. It produces slightly less honey than the Langstroth hive, but requires far less maintenance as well. There are no frames with preformed cells like you see in the Langstroth hive, but rather top bars that the bees draw out their comb from. The bees will spend more time developing the comb thus the slightly reduced honey output. There's a sloped roof to draw off moisture/water and a quilt layer on top (made from shavings) for insulation.  Typically, the beekeeper only needs to enter this type hive twice per year (spring to increase hive body boxes up to three and fall for harvest and reducing hive body boxes down to two).  The bees in this style hive are typically less stressed and more docile. See picture below for the components of this hive.

Here are three online stores that sell these hives:


3/07/2015

Flow Bee Hive Prototype -- Honey On Tap


This is a bee hive prototype made by a father and son out of Australia that I think is just cool. The bee hive design has windows that make the activity within the hive highly visible without need of disturbing the bees. You can even harvest the honey without disturbing the bees. Plus, with a traditional hive, you'd normally only extract once per year, but with this hive design, you can harvest one frame at a time throughout the year (multiple times) so that you can try honey at different times throughout the season. No need for expensive safety gear, smokers, or extraction equipment in order to harvest (although you might still want it for inspecting). It's really a very pretty bee hive design. Since the bees are less upset during harvest, I think this would be a perfect hive for an apartment dwelling urban bee keeper (*cough*).

Seriously though, I'm considering buying this and sticking it in my apartment back yard. Always put off having a hive because our rural land is 90 minutes away and we live in an apartment in the city, so it just never seemed right to have a hive and keep a close eye on the bees, but this style hive is calling to me. Only draw back is no chance to extract bees wax, but I think it's a very fair trade-off. 

The complete 10-frame flow hive is available for $600 (but they have several other options). A similarly sized 8-frame traditional cypress hive with veil, gloves, smoker, brush and hive tool is about ($375) plus extraction equipment ($150). So that's $600 vs $525. Some might still want veil, gloves and smoker to do inspections, which might cost around $85. In that case, it makes it $685 vs $440 (plus potential shipping and bees) for start-up costs on one hive. 

Checkout this page for more info and to make donations to ramp up production on the prototype: https://www.indiegogo.com/projects/flow-hive-honey-on-tap-directly-from-your-beehive and check out the video:


I suspect/hope that once production on this takes off (which I think it will), the price might drop some. It's not terribly complicated a design, really, to warrant a huge price difference b/w the two hives, I don't think, just a matter of mass producing them. 


2/12/2015

Seed Kits


Been piddling around with the idea of making a seed kit for a while now, and finally after having recently purchasing a seed kit for my mother-in-law as a gift, I finally bit the bullet and made on of my own. Despite hours of searching, I just couldn't find a kit that was exactly what I wanted.

The thing that bothered me about the seeds kits I saw online was that they usually included varieties that only grew well up north. They weren't packed with the hot humid summers and somewhat mild winters of Alabama in mind (no great overwintering plant varieties).  They weren't selected with the 4-season harvest garden in mind (little Elliot Coleman inspiration there). And either the kits were low variety count or else huge survival seed vault kits. Don't get me wrong, you can grow a pretty awesome garden with this kit, and you can save the seeds for a long time, but the intent here is to start a perpetual garden with a fairly large variety of seeds but low volume of each seed type for a fairly average sized garden. I DID want to follow the survival seed mantra of long term seed storage though, simply because every time I've ever bought a pack of seeds in the past, I've never planted them all, so if it comes in packaging that offers long term storage, then GREAT!.

Anyhow, this kit is over 20 varieties open-pollenated  heirloom veggies and herbs that will grow well in most areas of the USA, so check it out and see what you think. They're packaged in used cigar boxes (just love cigar boxes), so would make a cute gift. The individual seed packs are packed in paper then collectively packed in a double Mylar bag to make it moisture and light proof, then a desiccant is packed in each bag to keep moisture levels low enough for freezing, thus you can achieve much longer seed storage.

Anyhow, I'm excited. Check it out and let me know what you think. Opened a new store on big cartel: http://southerngreenliving.bigcartel.com/


5/26/2014

Who's My Pretty Baby


I'd never heard this song before until I was looking for a sound track for the background on a short video blurb of my son walking for the first time. Just think it's such as cute and sweet little song though. Have listened to it about 100 times in a row now. I'm hooked on her now (Elizabeth Mitchell)

5/24/2014

What to do with Garlic Scapes

This is our first year to grow a large planting of hard neck garlic (about 12 lbs worth). We plan to harvest all this garlic and replant it all to expand our supply. In the name of increased productivity, the garlic scapes (flower bulb) had to be cut off yesterday to prevent them zapping the bulbs. Virtually all of our garlic had produced scapes by the time we cut them (Music, Chesnock Red, and Inchillium Red). I honestly would like to see them bloom, but tough luck. Note: soft neck garlic, like you normally buy at the grocery store, doesn't normally make a flower bulb and basically is a clone. This flower allows the hard neck to cross pollinate and produce hybrid offspring from the seed garlic made within the flower bulb. Garlic scapes are sort of like eating the chives from onions + mild garlic flavor.
Garlic scapes on hard neck garlic
About a year ago, we travelled to Asheville, NC and stopped at a farmers co-op and had a breakfast biscuit. That was the most heavenly biscuit I ever ate. I have a thing about good biscuits, and this was one the best. Little did I know they'd put garlic scapes in it. I didn't even know what a garlic scape was before then, but I was bound and determined duplicate that biscuit (which has resulted in coutless failed attempts). If I ever do properly duplicate it, I promise to post a recipe.
Garlic Scape Cheddar Biscuits
Anyhow, now I have 2.5 lbs of scapes grown from 12 lbs of garlic (lots of scapes right?), so did my research on what I can do with all these rascals.

STORAGE OPTIONS:
  • Fresh: Store fresh in a flower vase for looks until you're ready to eat (might not want to store them this way for too long though)
  • Refrigerate: Store fresh in fridge for about a month.
  • Freeze: Food process or just blanche then freeze. Note: I like to make it into an pesto and then freeze it. It's very garlicky but not so much so that you can't enjoy it. Honestly, I still like traditional basil pesto better, but it is still really good, particularly if you're looking for creative uses for it b/c of the quantity you have (see recipe below).
  • Pickle: Can them in vinegar brine like you would cucumbers
  • Dehydrate: Food process, or finely dice then dehydrate to make a garlic spice. Mortar and pestle or crumble in hands afterwords to get a finer consistency. If you make it very fine, you can make a blend (salt, dried garlic spice, etc..) otherwise it will be more of a chive spice consistency
  • Maybe others, who knows'
VARIOUS USES:

Garlic Scape Pesto
~1 cup grated Parmesan or Tallegio cheese
~1-2 fresh lime/lemon juice + zest (or about 3 Tbsp)
~1/2 lb. garlic scapes - originally I weighed out a pound's worth but my giant food processor started filling up at what I'd estimate was half of that. And I quickly realized that was PLENTY of pesto. So I mostly just size it by the size it takes to fill up my food processor before processing. Chop it up and it goes down to about the half-way mark. Then add cheese, nuts, peas, and salt. Blend. Then add oil and blend (thus all the approximate marks).
~1/2 cup olive oil (however much it takes to get the consistency right)
~1 cup of toasted pine nuts, almonds, pecans, or walnuts- I prefer pine nuts but they are pricey. Once my pecan trees start making nuts, I'll probably just start using that in most recipes calling for nuts.
~1 cup of steamed English peas - this just dilutes the garlic-ness a bit and also gives it a good consistency. Can't really taste the peas.
~1/4 cup of fresh basil (if you have it, if not, no biggie) - when I made mine, I had garlic scapes but only tiny basil plants, so I went and nipped a few to add in
Salt to taste


Note: If you plant to eat it soon, just put it in a tall jar and top off with olive oil, then put a top on it to prevent oxidation. Or you can freeze it but be sure to get rid of all the air in the ziplock bag. Previously frozen pesto has a milder garlic taste. Can serve over toasted bruschetta or pasta with a side of grilled red bell pepper and/or steamed broccoli
Garlic Scape Pesto

Scapes as a Substitute for Garlic
Use them like garlic, as an aromatic in a wide variety of recipes. Scapes lose a lot of their bite when sautéed, more so than garlic cloves, so use at least three or four times as much scape-age as you would clove-age.


Scapes In Stir Fry
Scapes are popular in Asian dishes anyhow. Use in place of scallions or chives. Really you can use them in place of scallions or chives in any recipe, just about.
Asian Stir Fry with Garlic Scapes

Grilled Scapes as a Substute for Asparagus
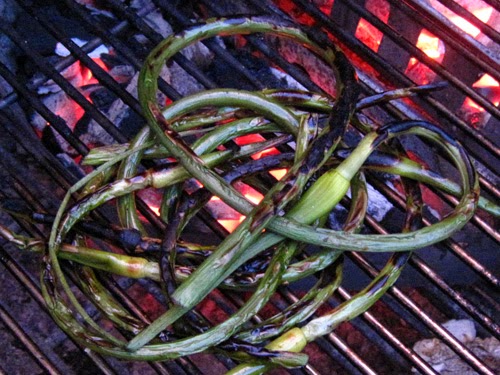
Another great, and very different, way to showcase scapes is to grill them, tossed with a little olive oil, salt, and pepper, over direct heat for about two minutes. Flip them once, halfway through, and finish with an extra sprinkle of flaky salt and maybe a bit of lemon juice and zest. They'll be charred in spots and just soft enough, and their flavor will have sweetened and mellowed dramatically. Grilled scapes are surprisingly reminiscent of asparagus, and surprisingly different from raw scapes.
Grilled Scapes - Served Like Asparagus

Roasted Garlic Scapes
Take the scapes and put them in a lightly oiled roasting pan, top with salt (kosher or sea salt works best). Put the loaded and covered pan in a hot (425°F) oven for 30 to 45 minutes or until they are beginning to turn brown. serve as a side or main dish. Tastes like roasted garlic but creamier. This is also good drizzled with a light cheese sauce.


Sauted Scapes
Just tonight I boiled then sauted fresh beets in balsamic then tossed in some diced scallions at the last second. I usually just leave it with beets and balsamic but the scapes were a great mild garlic addition.


Scape Quiche
Or could just as easily just include them in an omlet
Garlic Scape Quiche

Garlic Scape Mashed Potatoes
Only add a little, then taste. This stuff's weird how you sometimes need a lot to equal a garlic clove and other times not. So best to add too little than too much.

In Flower Arrangement
Weird but cool, plus they're pretty to look at up until you EAT them.

Garlic Scape Flower Arrangement
Or let let them bloom
Garlic Flowers

Garlic Scape Vinegar
1 cup of white or rice vinegar with 1-2 fresh bruised green scapes. Let infuse 10 days for max flavor. Can replace scapes to keep pretty green color going. This could just as easily end being pickled scapes as well. Just cram more scapes in. Then you're primary eating the scapes vs the flavored vinegar.
Garlic Scape Flavored Vinegar

5/10/2014

Tractors and Implements 101

We've owned 10 acres of land for the last 3 years and have managed to squeek by without owning a tractor outright through a combination of tractor rentals and a very kind neighbor (he surprises us with a tilling or a bush hog from time to time). On 1-2 acres we're growing fruit bushes and fruit trees, 1 acre's growing a vegetable plot, 3 - 4 acres is wooded, and the other ~4.5 acres is grassland. But tractor rentals are expensive ($400 per round trip) and it's time to REALLY get serious about how we're going to manage these 10 acres. Being just a small amount of land, cost is a major consideration. We're total newbs regarding tractors, so it was time to do a little research. The major considerations are 2-wheel tractor, used 4-wheel, or new 4-wheel, although lately been reading ATV 4-wheeler use for land management. Sounds intriguing (could it work for the short term?). We have a strong preference for diesel.

TRACTOR CHOICES


2-Wheel Walking Tractor

Pros: Cheaper than a 4 wheel (Grillo G85d 8 hp diesel is $3500). Small size is a plus since we don't have a trailer for transportation, nor proper storage for a full size tractor. Could store this one in parents shed for interim. Supposedly these things never break, b/c they have no gears or belts, but if they do, the warranty is pretty awesome. Manufacturer & Elliot Coleman recommend this tractor for a land our size. There are tons of implements for this thing, possibly more than for the 4-wheel tractor. New  implements are cheaper than new ones for a 4-wheel. Supposedly easier to work on than a 4-wheel tractor. More maneuverable around corners. Can turn 180 degrees. Much better at cultivating between rows (much less wasted space) and between fruit trees & bushes. Light weight won't cause any soil compaction. Cons: You have to walk the tractor (unless you buy a sulky). Top speed is a fair bit slower. These are only really a con when trying to use it for mowing, but I figure we can diminish this con some by planting more trees along the edges of the property that don't interfere with the path of the sun and reduce the "grassland" area some. Other con is there aren't many folks selling or repairing these guys. And there aren't really any used implements for sale in the area. Fortunately they do have a dealership in Auburn though. Not close, but not an eternity away either. If a mulch layer for growing strawberries is big on your list, these aren't nearly as effective as the implements available for a 4-wheel tractor, but might be in the future.
Grillo G85D 8hp

4-Wheel Tractor - Used

Pros: You can get a used 4-wheel tractor for about the same price as a new 2-wheel, but it has to be pretty old to match the price. Found a diesel international 18 HP with 1700 hours with a mower for $2400 just today. 1700 is a lot of hours though. And it's 2 wheel drive with turf tires, so pretty sure that thing'll get stuck on our mucky parts (since the 4-wheel drive normal tire john deer we rented did a lot). Used implements are cheaper than new ones and there are plenty of used implements to be found. They're still more expensive than new 2-wheel tractor implements in most cases (i think, I need to do more research here). Plenty of folks that can work on these, most likely. Fast mowing. Cons: Possibly a maintenance nightmare. It's a crap shoot. Can cause soil compaction over time due to weight. Where will we store it? How will we transport it? We don't have a barn yet. Barns are expensive too. Depending on the type of used tractor you buy, it might be hard to find parts for (ex/ Iseki).
Used Iseki Diesel Tractor From Craigslist with 500 hours for $2300

4-Wheel Tractor - New

Pros: New so won't break. If it does, it's under warranty. If it breaks after warranty, you'll still be able to find parts for it for a long while. Plenty of mechanics familiar with the new tractors. Cons:  A compact Kubota starts at about $12k plus we'll need a barn to store it in. Crazy expensive. Plus i'd prefer a front loader (which adds about 2-4k) and all wheel drive (which adds more, how much?).
Kubota B2320 4wd Gas Tractor - $13,000

IMPLEMENTS

On to implements for the tractor cause cost of tractor isn't the end of it. Tractor's useless without implements.


Subsoiler

For deep tillage. Breaks up hard pan & compacted layers without mixing top and subsoil. Aerates the soil improving drainage and increasing root depth. Good at preparing soil for fruit tree planting. Depth it digs can depend on strength of the tractor.  Usually compact tractors can only handle a single tine subsoiler. These tend to be fuel hogs and require a lot of horsepower to get really deep, particularly with more than 1 tine.

Chisel Plow

For deep tillage, although not as deep as the subsoiler. Made in 1930's as a soil conserving alternative for the moldboard plow. AKA soil ripper.
Soil Ripper

Moldboard Plow

For deep tillage. Old school way of plowing the ground. Very cheap implement. Turns over the soil and can handle even large rocks (too rocky for the chisel plow). Tends to mix subsoil with topsoil so better to use chisel plow over moldboard plow, if soil's not too rocky.

Cultivator

For pulling weeds up after soil's already been initially worked and planted, and for working in veggie residue (ex/ overwintered green manures). Tills the top 2" or so.

Disc Harrow

Used to smooth the surface for planting. Certain arrangements of disc can be used to make rows (called disc hillers). Sometimes the disc hiller is combined with a chain to smooth the top of the hill/row to prepare a fine smooth seed bed.
Disc Hillers
Disc Harrow

Chain Harrow

Used to smooth the surface after disc harrowing. Also can be used to break up manure. Pulls out the trash and debris (bad if you want the plant debris incorporated into the dirt). Can turn it over (tines pointing up) if you want to make an ultra smooth seed bed. Tines down scratch/rake the surface.
Chain Harrow pulled behind a 4-wheeler

Spike Harrow 

Very similar to the chain harrow and basically used for the same thing except more rigid. Less aggressive than the cultivator or chisel plow.
Spike Harrow

Potato Plow 

Name pretty much says it all but it's used to dig up potatoes, garlic, onions, sweet potatoes, turnips, and other root type veggies. 
Potato Plow

Rotary Tiller 

For shallow tillage on a compact tractor or 2-wheel tractor (can go deeper on large tractors). Combines the work of the plow, disc, and harrow. Helps prevent "overworking" the soil (although still possible). Easier to use, skill-wise, than the other three items.


Mower - Flail

Used for cutting rough / tall grass and brush. Doesn't sling like bush hogs. Often used by tractors that cut grass along the side of highways.

Flail Mower

Mower - Sickle Bar

Used to cut grass and not shred it up like with a bush hog. Just cuts at the base. Good for cutting into ditches or up steep hills while tractor remains level. They use very little power and don't get plugged on very tall material like bush hogs. Susceptible to damage if they encounter an object they can't cut. Tend to be safer than bush hogs (less slinging). 
Sicklebar Mower


Mower - Rotary Cutter

Aka bush hog although bush hog is a brand name but has become a common word encompassing all brands of rotary cutter mowers. Single rotating blade used for cutting down brush and super tall grass.
Bush Hog -- Rotary Cutter

Finishing Mower 

For mowing grass after it's been bush hogged, if you want a lawn like appearance. Doubt we'll ever get this one though (not soon anyhow).
Finishing Mower

Wheel Rake

Used for raking hay into piles. Usually followed up by a hay baler, but if you just wanted to gather hay for making mulch/compost, you could skip hay balers which are VERY expensive.
Wheel Rake

Pine Straw Rake

Might be handy if you have a lot of pine. Little extra income selling pine straw. 

Chipper / Shredder

Attaches to the Tractor PTO for power. Some can chip up to 6" diameter wood as well as leaves. Awfully handy for property requiring a lot of cleanup or with wooded areas. Makes great compost / mulch. Ranges from $1000 - $3000.


Auger

Used for post hole digging for fences (or a well?) or pre-drilling holes for fruit tree. Sometimes holes end up too compacted for proper root expansion.
Auger For Post Hole Digging

4/24/2014

Inspirational Music


For me, this one is not at all to do with card games but rather life


This one's more to do with the song and less about the video


I'll admit, I'm torn. I LOVE Tommy Emmanual but I also REALLY like the original and simpler version of this song by Mason Williams.


4/14/2014

Tulip Fields In Holland


My very kind neighbor gave us his collection of bird books before he died and in one of them was this nice quote. "For in the end, we will conserve only what we love, we will love only what we understand, and we will understand only what we're taught" - Baba Dioum

4/13/2014

Power of Prayer


The power of this photograph. 100,000 Buddhist monks in prayer for a better world.

Bean Planting + April Farm Activity

The strawberries and garlic (and weeds) are growing with a vengeance.

Our kind neighbor, with a tractor, tilled up about an acre for us without us even asking. So we had to kick butt and get something planted. Having not planned what best to grow, since we're basically farming from afar, we decided to do soil enriching beans and peas. We got varieties suitable for picking dry and growing in bush form since that's likely what will happen and we're not putting in trellis'. Hopefully we'll get at least a couple of fresh batches.

Next year we're DEFINATELY getting an earthway seeder.


We planted the following from Massey Mercantile:
  • Pink-Eye Purple-Hull Cow Peas: 49 days.  Heavy yields. Good disease resistance.
  • Zipper Cream Cow Peas: 75 days. Good yields of light colored peas. String acts like a zipper to make for easy shelling. AKA southern peas.
  • Ford Hook Bush Limas: 70 days. AAS Winner. Finest + largest butter / lima bean. Best yielder.
  • Speckled Red Bush Limas: 76 days. Pretty seed. Grows well in hot weather. Very productive.
  • Contender Green Bush Beans: 55 days. Extremely early + prolific. Long round oval pods. Resistant to mosaic + powdery mildew.
  • Roma II Green Bush Beans: 58 days. Broad flat pods. Very tasty fresh. Disease resistant.  
Might I saw it's shocking what a difference seed cost is when you buy in bulk. In my lack of planning I originally bought all these seeds in 1/4 lb quantities thinking it would be enough. I changed that out for a pound each and it ended up being less than twice as much. 4x the seed for about 1.5x the cost. Weird.


Native American Legend of the Three Sisters


I'm planting this garden and writing this post for my two sweet sisters for National Sibling Appreciation day. The Native American legend of the Three Sisters vary between tribes, but this particular story is from Lois Thomas of Cornwall Island found in "Indian Legends of Eastern Canada".

Three Sisters Garden - Corn, Beans, Squash

The Three Sisters Legend

A long time ago there were three sisters who lived together in a field. These sisters were quite different from one another in their size and way of dressing. The little sister was so young that she could only crawl at first, and she was dressed in green. The second sister wore a bright yellow dress, and she had a way of running off by herself when the sun shone and the soft wind blew in her face. The third was the eldest sister, standing always very straight and tall above the other sisters and trying to protect them. She wore a pale green shawl, and she had long, yellow hair that tossed about her head in the breeze. There was one way the sisters were all alike, though. They loved each other dearly, and they always stayed together. This made them very strong. One day a stranger came to the field of the Three Sisters - a Mohawk boy. He talked to the birds and other animals - this caught the attention of the three sisters. Late that summer, the youngest and smallest sister disappeared. Her sisters were sad. Again the Mohawk boy came to the field to gather reeds at the water's edge. The two sisters who were left watched his moccasin trail, and that night the second sister - the one in the yellow dress - disappeared as well. Now the Elder Sister was the only one left. She continued to stand tall in her field. When the Mohawk boy saw that she missed her sisters, he brought them all back together and they became stronger together, again.


The Iroquois Legend of the Three Sisters

Erney, Diana. 1996. Long live the Three Sisters. Organic Gardening. November. p. 37-40.
The term “Three Sisters” emerged from the Iroquois creation myth. It was said that the earth began when “Sky Woman” who lived in the upper world peered through a hole in the sky and fell through to an endless sea. The animals saw her coming, so they took the soil from the bottom of the sea and spread it onto the back of a giant turtle to provide a safe place for her to land. This “Turtle Island” is now what we call North America. Sky woman had become pregnant before she fell. When she landed, she gave birth to a daughter. When the daughter grew into a young woman, she also became pregnant (by the West wind). She died while giving birth to twin boys. Sky Woman buried her daughter in the “new earth.” From her grave grew three sacred plants—corn, beans, and squash. These plants provided food for her sons, and later, for all of humanity. These special gifts ensured the survival of the Iroquois people. 

Three Sisters Garden

The Three Sisters Garden is a technique where corn, pole beans, and vining squash are all three grown together on a mound. The three benefit each other where the corn provides a pole for the bean to climb. The bean provides nitrogen for the other plants, and the squash shades the ground later in the season preventing other weed growth and the mound from getting too hot.

Source:
http://www.birdclan.org/threesisters.htm

3/25/2014

Easy care bag garden


These simple bag garden plans are from the book Starter Vegetable Gardens. It's a 3 year plan. This idea is pretty genius, I think, as it's minimal effort, really cheap, and creates 3 foot wide rows which I think are ideal.

What I like is that you buy a cheap $2 bag of top soil and grow some shallow rooted veggies for one year and end up with the weeds all smothered beneath without even digging. Stack several side by side and you end up withr a 3 foot wide garden row. Then cover the edges with hay to hide the bags.

Year 1 bag garden plan:

Year 2 bag garden plan:

Year 3 bag garden plan:

Pretty bag garden example (although it doesn't use the top soil bag):

With top soil bag: